MacOS driver for Canon LaserJet LBP-1120

How to print on printer without MacOS driver?
I’ve got Canon LaserJet LBP-1120.
It has driver for Windows XP but not for MacOS.
So solution is obvious. We setup the printer in Windows. Also we install in Windows virtual printer. This printer will send unparsed PostScript document to a real printer. In MacOS we install Generic PostScript Printer. It will send PostScript document to our virtual printer in our virtual Windows.
Double virtual should not confuse you. Any software engineer won’t do boring 2-hours work. He will automate it.. in two days. This way he won’t work at all - he will play with fancy problems doing this 2-days task 8-)
TL;DR
- Install virtual Windows in MacOS (I am sure you will use it afterwards for other tasks too)
- Install real printer in Windows with real driver from Canon
- Install virtual printer in Windows. It will send unparsed PostScript to the real printer
- Install Generic PostScript Printer in MacOS that will send PostScript to virtual printer in Windows
Virtual Windows in MacOS
We need Virtual Machine and Windows XP distro.
Virtual Machine
I recommend Oracle Virtual Box. Download
OS X hosts.
It’s very easy to install.
Windows XP distro
Microsoft does not support Windows XP. So this is your responsibility how to get your licence. I just show how to install in most simple way.
So we can download Windows XP from Microsoft site.
I used this link.
If it does not work just search for Windows XP Mode in Microsoft Download Center.
And I have a nice trick how you can save your time on Windows installation.
- Install in MacOS The Unarchiver.
- Unpack
Windows XP Modeinstaller you downloaded. - After that unpack file
xpminsources/xpminstl64. It has no extension so you shouldOpen With..->other...->The Unarchiver.app. - In the folder after second unpacking, find file
VirtualXPVHD. You should rename it intoVirtualXP.VHD.
As a result of this trick you have Oracle Virtual Box disk with already installed Windows XP.
Now we create virtual machine in Oracle Virtual Box - press blue icon “new”:
Choose Windows XP 32bit. Memory 512Mb.
Choose Use an existing virtual hard disk file. Press on tiny folder with green arrow.
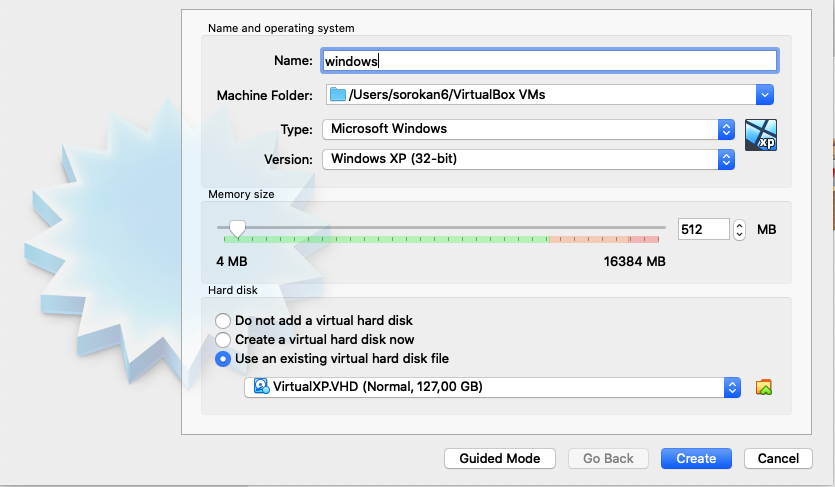
After that press icon Add with green “+” and add our unpacked and renamed file VirtualXP.VHD.

Setup Video Memory 128MB for this machine.
Now you start the virtual machine and see already installed Windows XP.
How to right-click
To do mouse right-click in virtual Windows press Shift+Cmd and do mouse click.
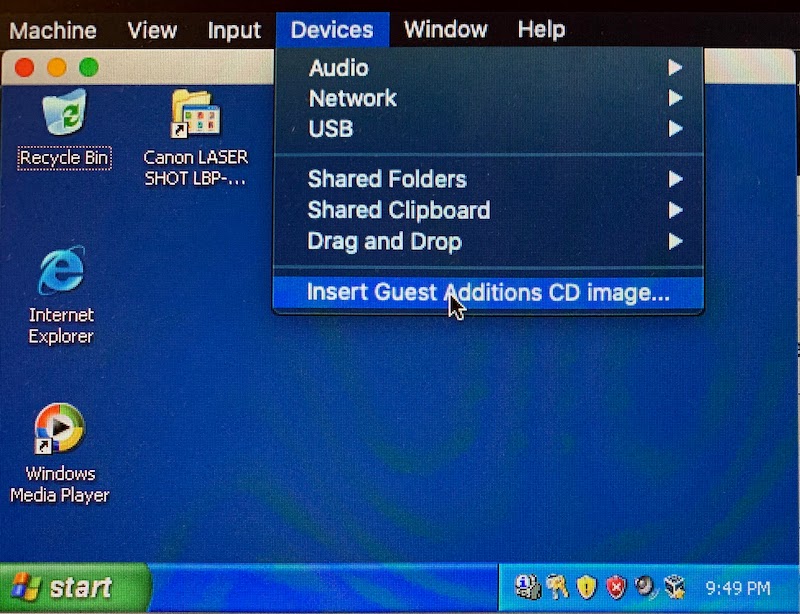
VirtualBox Guest Additions
To have your mouse, clipboard and other things work properly you should install
Oracle's Guest Additions in our virtual Windows (Guest Windows in Oracle’s terms).
In the Devices menu in the virtual machine’s menu bar, Oracle VM VirtualBox has a menu item Insert Guest Additions CD Image, which mounts the Guest Additions ISO file inside your virtual machine.
A Windows should then automatically start the Guest Additions installer, which installs the Guest Additions.
Real printer in Windows
Just usual way to install printer in Windows: Start ->
Printers and Faxes -> Add a printer. Select Canon driver from the Canon CD.
I advice to print test page to be sure it was installed Ok.
Important - to simplify next steps the printer name should not include spaces and special simbols.
I use name canon.
Virtual printer in Windows
GhostScript
To parse PostScript файлы we will use free software GhostScript.
Last version does not work in Windows XP, so use old one
9.50, file
ghostpcl-9.50-win32.zip.
Unpack and run installer in Windows.
Important install into folder C:\gs to simplify next steps.
Command line parameters for GhostScript
We will use file for command line parameters to simplify command in the virtual printer.
In folder C:\gs create rsp file. For example with Notepad.
My file has name canon.rsp.
File content:
-IC:\gs\lib;C:\gs\Resource\Font
-sDEVICE=mswinpr2
-dNOPAUSE
-dSAFER
-sPAPERSIZE=a4
-sOutputFile="%printer%canon"
In the last line after %printer% should be the name of our real printer.
RedMon
To redirect PostScript to real printer we use
RedMon. I installed version 1.9.
Unpack and run installer in Windows.
Virtual printer setup
We have to setup RedMon redirect port so that it will pass unparsed PostScript to real printer.
Create printer. Start -> Printers and Faxes -> Add a printer.
In the wizard switch off
Automatically detect.. so we won’t wait for driver search.
On the next wizard step choose Create a new port with type Redirected port.
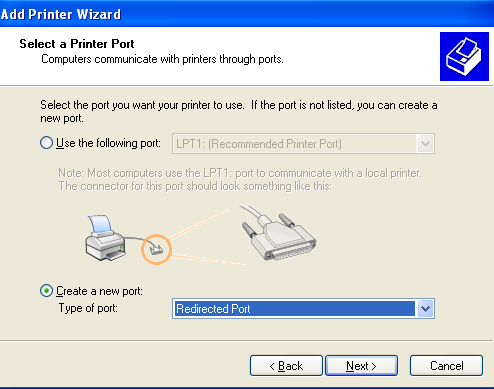
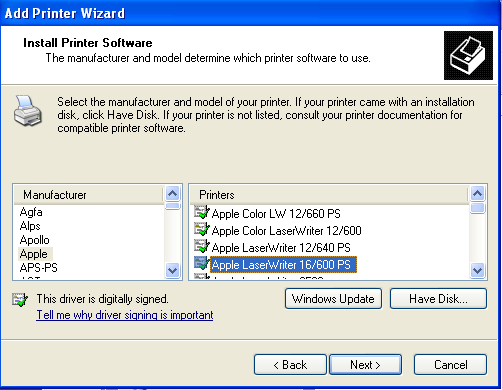
As driver you could select Apple LaserWriter.
Create the printer without test page printing.
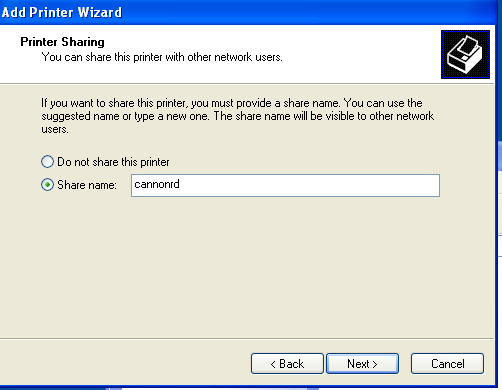
Do not forget to share it (Printer Sharing):
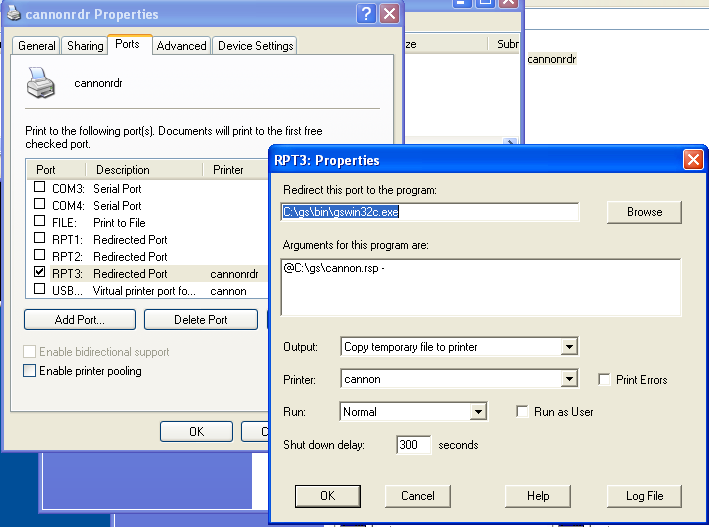
On the newly created printer right-click, choose Properties.
For Redirected port set command line C:\gs\bin\gswin32c.exe. Do not forget about c in the
file name.
Arguments @C:\gs\canon.rsp -. Do not forget space and dash at the end.
Choose Copy temporary file to printer in Output. As printer choose real printer.
Press Ok.
Printer name in my case canonrd.
Right-click, Properties -> General -> Print Test Page.
MacOS Printer
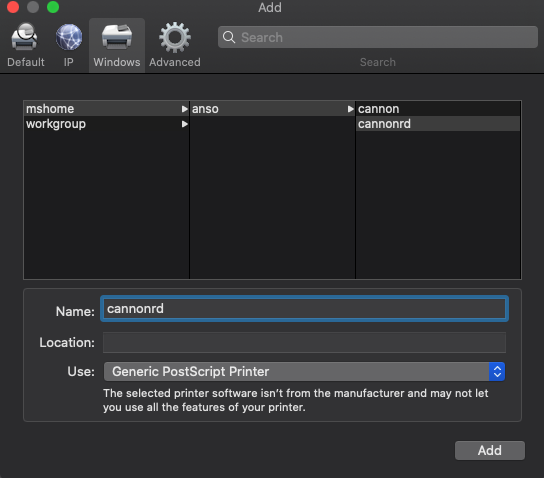
Create the printer as usual for MacOS. System preferences -> Printers & Scanners
Press “+” at the bottom of printers list.
Press Windows, select the Windows network and machine name for your virtual Windows machine.
And with some delay you will see list of shared printers. You should select virtual one - canonrd
in my case. Driver: Generic PostScript Printer.
That’s all. Now you can print from MacOS to Canon LBP-1120.
Just do not forget to start Windows Virtual Machine. It starts in split second. And you can automate that with Alfred using command line:
VirtualBoxVM --startvm "<your virtual machine name>"