Amazon Dash Button hack: Installation on Synology with Docker
Installation for the Amazon Dash Button hack, described in Your DIY smart wifi button.
Installation in Docker on Synology
Add Docker image amazon-dash-button-hack:

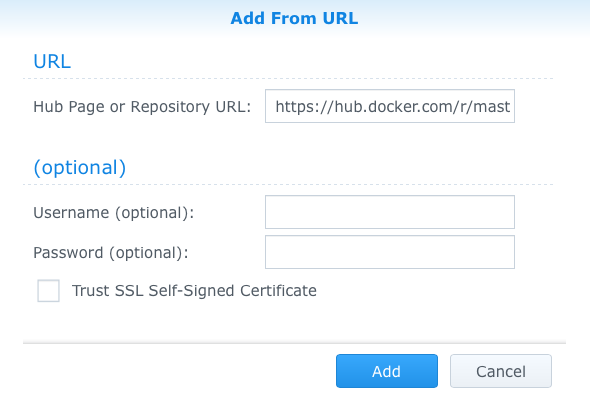
When download finished, we can create Docker container.
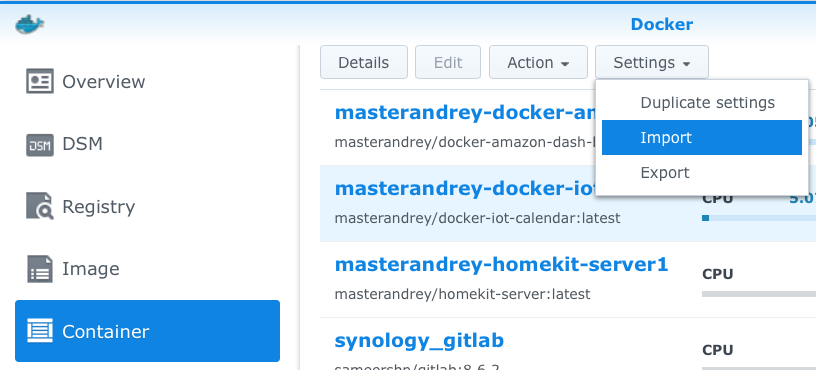
Instead of the instructions below you can just import
my container settings.
The only specific thing that they assume - that you place secrets and settings
in folder docker/amazon-dash-private.
Or you can do all that by yourself - see instructions below.
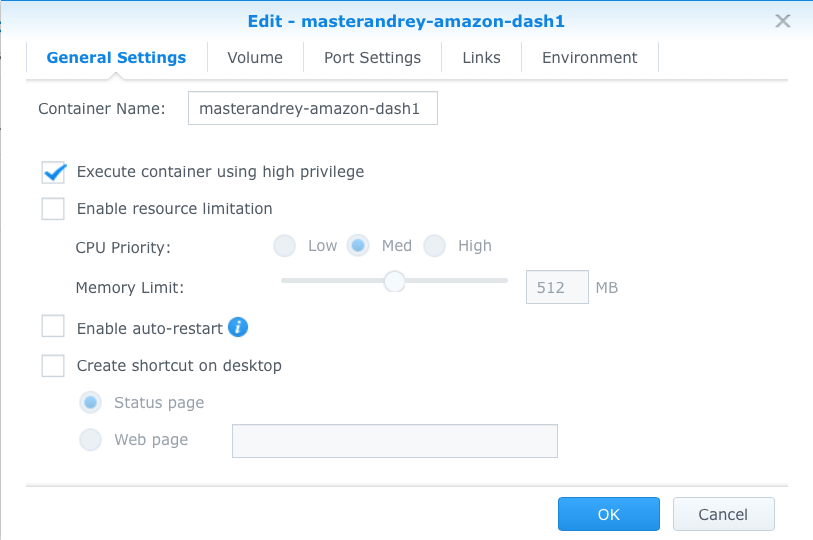
Double-click on the image to create Docker container
Give high privilege because it sniffs network traffic:
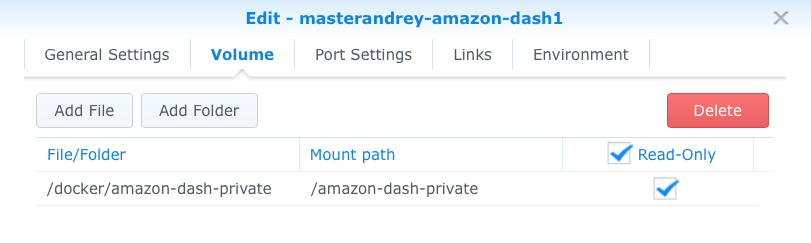
In Advanced settings -> Volume add folder /amazon-dash-private with secrets and settings.
Download examples
of this files and place them in any place on Synology.
In my case this is folder docker/amazon-dash-private on Synology volume:
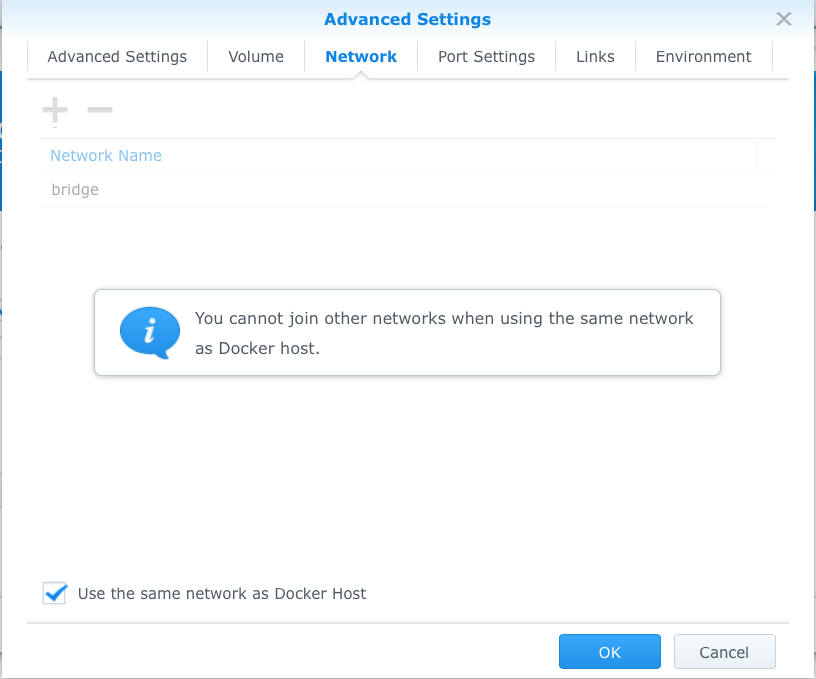
In Network turn on Use the same network as Docker host:
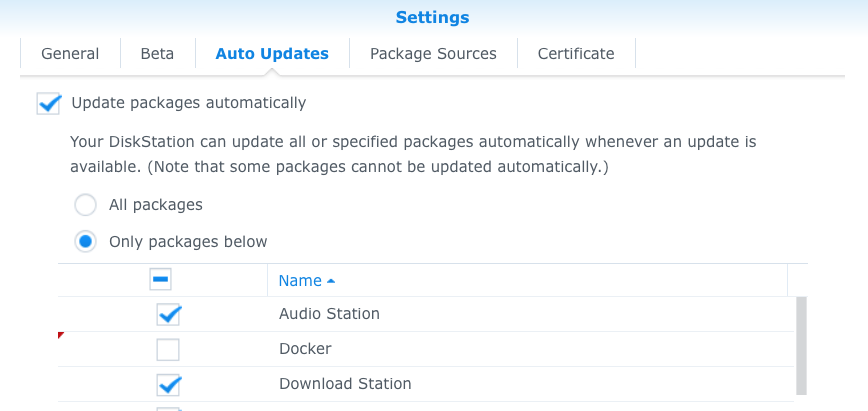
And in Synology Package Center switch off auto-update for Docker.
Because it will stop all running containers after auto-update and your Docker applications suddenly stop to work.
So better to update Docker package manually and start the container after that.
Not Synology
Place amazon-dash-hack.json and other files in folder
amazon-dash-private and add to your docker command line:
-v $PWD/amazon-dash-private:/amazon-dash-private:ro
$PWD instructs Docker to search amazon-dash-private folder in the same folder
where you start Docker.
If you place folder somewhere else you should change that path.
And the container should use host network:
--net host
Amazon Dash Button setup
Your button have to connect to your wifi to do anything useful.
To setup it you shold have Amazon Prime subscription, without it there are no button setup options in amazon mobile app. Even if you had Prime subscription before and already bought a number of buttons, when your subscription gone, you cannot setup even already bought buttons.
Amazon app constantly changing but the general direction - you should place the
button near your phone and select in amazon mobile app Your account ->
Dash buttons and devices -> Set up a new device.
And you go in the set up process to the point where they ask you to choose the product -
do not do that, just stop here.
If you select a product, every button press will order that product and I think this is not what you want.
If you have not permited to save your wifi-passwords while installing your Amazon devices before, amazon app will ask for wifi-password to connect Amazon Dash Button to your wifi network.
During setup your phone communicate with button through sounds that ours ears cannot hear, that’s why you should place them close enough.
Register button in app
File buttons.json (in the folder that we placed on Synology) describes MAC-addresses of your buttons.
To get MAC-address you can use web-server inside amazon button.
Connect to wifi Button ConfigureMe
that is created by amazon button before you set it up.
Open web-page http://192.168.0.1 and on this page find MAC-address.
For button that you already setup you can see MAC-address in my app log. My app logs every MAC-address once (after reboot), so after you press your amazon button the MAC-adress would be last one in the log.
To see the log, in Synology in window docker in containers list select container with my app,
press Details and open log.
Add MAC-address to buttons.json and use any name as button name (you will use it later in settings.json).
My app loads settings only on start so you have to restart it to load new settings (turn OFF and ON again switch for the container in containers list).
Congratulations! Your button works and performs default actions (in section
__DEFAULT__ of the settings.json).
Now we can customize it.
Button actions
Add to settings.json section with your button name (the same as in buttons.json)
and describe all action that you need from that button (button can do many actions of
one or different types).
Action types described below. You can setup only that action types that you need.
Documentation for settings.json
IFTTT
With IFTTT you can use thousands of ready integrations with nearly everything you can think of.
On IFTTT site choose My applets -> New applet, for then part select Maker webhooks and enter
event name.
The same string as in event name you should place into summary parameter of action with type ifttt
for this button in settings.json.
For that part on IFTTT site you choose everything you want from broad IFTTT palette.
Send email, sms, post to evernote,
turn on smart switch and so on.
Value1, Value2, Value3 from the button action you can use in IFTTT like ` `.
Before you can use IFTTT with your buttons you should place secret key into ifttt-key.json file.
In Maker Webhook applet get
URL, open it and you will see your key at the top of the page (Your key is:).
Google Sheets and Google Calendar (Google Drive)
Challenging part - to get google credentials for my app to work with Google API.
Enable API:
In IAM -> Service accounts
create or select existed service account and in tab Keys do Add key -> create new key -> JSON.
As result you get json-file with credentials for my app.
Rename it into amazon-dash-hack.json and replace with it my example in
/amazon-dash-private.
Spreadsheet to register events in you better copy from example.
And rename it into amazon_dash.
If you want you can change the name in settings.json (parameter name for the action).
Also you can change spreadsheet sheets names
(press_sheet and event_sheet).
For intergration with Google Calendar
place Calendar ID into parameter сalendar_id of the action. I recommend to create new
separate calendar for that because button logic could mess with manualy created events.
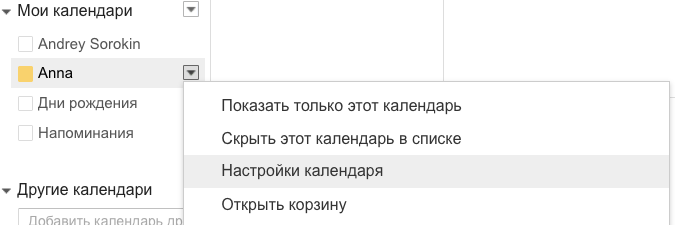
Calendar ID you can get from calendar settings:
Do not forget to give access to the sheet and calendar to the app user (email you can see in json-file).
Event logic
Each amazon button press inserted into Google Sheets press sheet.
In event sheet would be inserted events with logic described below.
If button pressed less then restart seconds after last press, the press
would be added into press sheet, but change nothing in event.
If previuos event started more than autoclose seconds ago and not closed yet,
if would be auto-closed with default seconds length and new event will start.
In other cases app closes unclosed event or starts new one if previous event
is already closed.
That logic helps if you forget to close event - next time app auto-close it with resonable duration.
The same logic for Google Calendar, except there is no analog for press sheet,
just events.
Presentation
Отображение
There are a huge number of possibilities what you can do with the data from Google Calendar or Google Sheets.
If you want to use you old Amazon Kindle and place it on wall, you can use my project IoT (Internet of things) events on Kindle.